ローカルPCから固定IPでのみアクセス可能なサイトにアクセスする方法(1)(Feat. EC2, SSM port forwarding)
固定IPでアクセス可能なサーバーを作成する

実務を行う際、固定IPからのみアクセス可能なサイトやAPIを使用する必要がある場合があります。
このような場合、ローカル環境から固定IPで送信されるように処理する必要がありますが、どのように行うべきかを調べてみましょう。
アーキテクチャ
まず前提条件として、目的のサーバーに固定IP設定がされていることを前提とします。
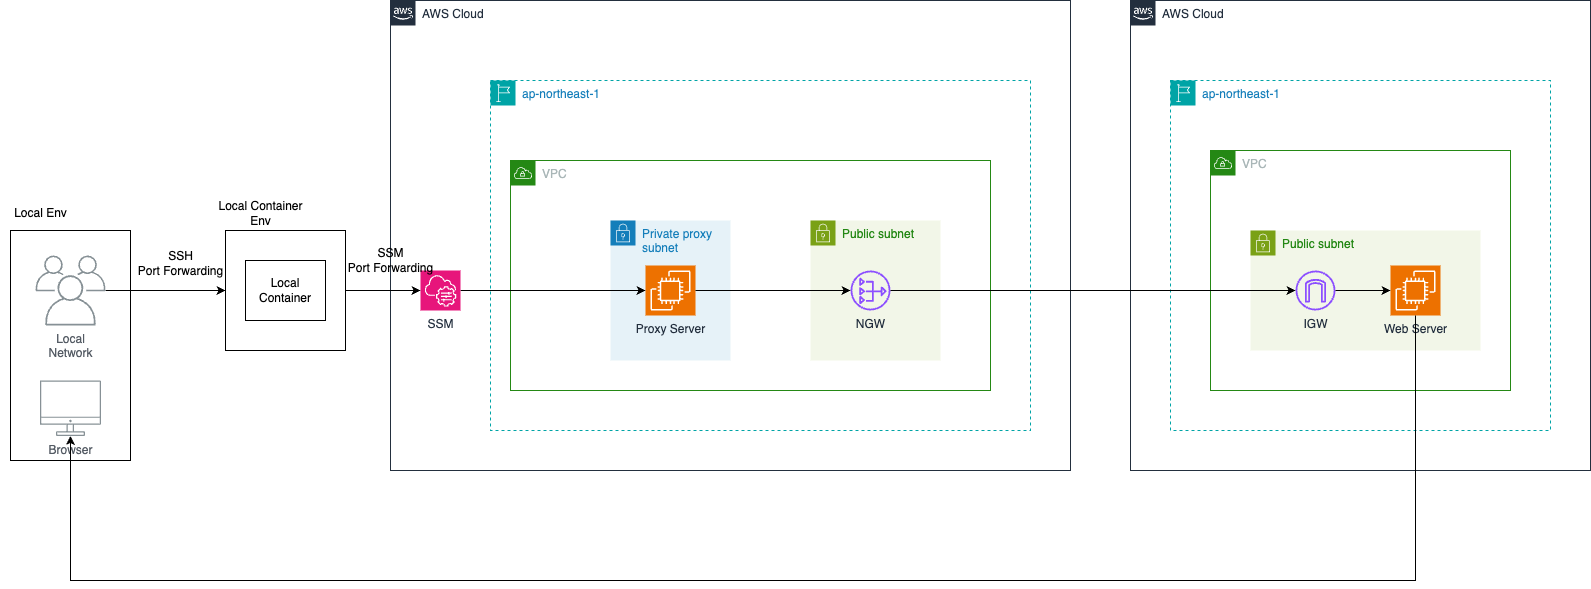
構成は以下の通りです:
- ローカルPCでDockerコンテナを構築(アプリケーション兼ポートフォワーディング用)
- VPC内にprivate subnetを構築
- NAT Gatewayを割り当て
- プロキシ用EC2、squidでプロキシ設定
- アクセステスト
固定IPでアクセスする対象サーバーがないので、まず作成してみましょう。
シンプルにnginxサイトにしましょう。
ここではterraformで構築する予定です。
フォルダ構成
フォルダ構成は以下の通りです。
1
2
3
4
5
6
7
8
9
10
11
12
13
14
15
16
17
18
19
│── proxy-server-test/
  │── infra/
     │── modules/
       │── static-server -> 固定IP対象サーバー
           │── main.tf -> 各種AWSサービス定義
           │── variables.tf -> main.tfで使用する変数定義
           │── output.tf -> 他のmoduleでも使用できるように変数export
       │── proxy-server -> プロキシサーバー
     │── main.tf -> 実行ファイル
     │── provider.tf -> providerファイル
  │── docker-server/ -> ポートフォワーディングを行うdockerサーバー
     │── dockerFile
     │── docker-compose.yml
     │── container-startup-using-PF.sh
     │── ssh-for-proxy
        │── execution-local-to-container-port-forwarding.sh -> local -> dockerでポートフォワーディング(ssh)
        │── for-ssh -> 秘密鍵
        │── for-ssh.pub -> 公開鍵
        │── sshd_config -> sshサーバー設定
まずprovider.tfでプロバイダーを指定しましょう。
1
2
3
provider "aws" {
  region = "us-east-1"
}
固定IPサーバー構築
固定IPサーバーを構成してみましょう
サーバーで使用するelastic IPは事前に割り当てを受けたと仮定します
1
2
3
4
5
6
7
8
9
10
11
12
13
14
15
16
17
18
19
20
21
22
23
24
25
26
27
28
29
30
31
32
33
34
35
36
37
38
39
40
41
42
43
44
45
46
47
48
49
50
51
52
53
54
55
56
57
58
59
60
61
62
63
64
65
66
67
68
69
70
71
72
73
74
75
76
77
78
79
80
81
82
83
84
85
86
87
88
89
90
91
92
93
94
95
96
97
98
99
100
101
102
103
104
105
106
107
108
109
110
111
112
113
114
115
116
117
118
119
120
121
resource "aws_vpc" "static-server-vpc" {
  cidr_block           = var.vpc_cidr
  enable_dns_support   = true
  enable_dns_hostnames = true
  tags = {
    Name = "static-server-vpc"
  }
}

resource "aws_subnet" "public_subnet" {
  count                   = length(var.public_subnet_cidrs)
  vpc_id                  = aws_vpc.static-server-vpc.id
  cidr_block              = var.public_subnet_cidrs[count.index]
  availability_zone       = var.availability_zones[count.index]
  map_public_ip_on_launch = true
  tags = {
    Name = "static-server-subnet-public ${count.index + 1}"
  }
}

resource "aws_internet_gateway" "igw" {
  vpc_id = aws_vpc.static-server-vpc.id
  tags = {
    Name = "static-server-igw"
  }
}

resource "aws_route_table" "public" {
  vpc_id = aws_vpc.static-server-vpc.id
  tags = {
    Name = "static-server-route-table-prd"
  }
}

resource "aws_route" "public_default_route" {
  route_table_id         = aws_route_table.public.id
  destination_cidr_block = "0.0.0.0/0"
  gateway_id             = aws_internet_gateway.igw.id
}

resource "aws_route_table_association" "public" {
  count          = length(aws_subnet.public_subnet)
  subnet_id      = aws_subnet.public_subnet[count.index].id
  route_table_id = aws_route_table.public.id
}

resource "aws_security_group" "static-server-sg" {
  name        = "static-server-sg"
  vpc_id = aws_vpc.static-server-vpc.id

  egress {
    from_port   = 0
    to_port     = 0
    protocol    = "-1"
    cidr_blocks = ["0.0.0.0/0"]
  }

  tags = {
    Name = "static-server-sg"
  }
}

resource "aws_security_group_rule" "static-server-sg-rule" {
  type                     = "ingress"
  from_port                = 0
  to_port                  = 0
  protocol                 = "-1"
  security_group_id        = aws_security_group.static-server-sg.id
  cidr_blocks = ["0.0.0.0/0"]
}

resource "aws_iam_role" "static-server-ssm-role" {
  name = "static-server-ssm-role"

  assume_role_policy = jsonencode({
    Version = "2012-10-17"
    Statement = [{
      Action = "sts:AssumeRole"
      Effect = "Allow"
      Principal = {
        Service = "ec2.amazonaws.com"
      }
    }]
  })
}

resource "aws_iam_policy_attachment" "static-server-ssm-attach" {
  name       = "static-server-ssm-policy-attach"
  roles      = [aws_iam_role.static-server-ssm-role.name]
  policy_arn = "arn:aws:iam::aws:policy/AmazonSSMManagedInstanceCore"
}

resource "aws_iam_instance_profile" "static-server-ssm-instance-profile" {
  name = "static-server-ssm-instance-profile"
  role = aws_iam_role.static-server-ssm-role.name
}

resource "aws_instance" "static-server-instance" {
  ami                  = "ami-0c518311db5640eff"
  instance_type        = "t4g.micro"
  subnet_id            = aws_subnet.public_subnet[0].id
  vpc_security_group_ids      = [aws_security_group.static-server-sg.id]
  iam_instance_profile = aws_iam_instance_profile.static-server-ssm-instance-profile.name

  lifecycle {
    ignore_changes = all
  }

  tags = {
    Name = "static-server-instance"
  }
}

data "aws_eip" "existing-static-server-eip" {
  id = "サーバーIPで使用するelastic IPのid(eipalloc-xxxx)"
}

resource "aws_eip_association" "eip-assoc" {
  instance_id   = aws_instance.static-server-instance.id
  allocation_id = data.aws_eip.existing-static-server-eip.id
}
variable.tfファイルで割り当てるパラメータを設定しましょう。
1
2
3
4
5
6
7
8
9
10
11
variable "vpc_cidr" {
  type        = string
}

variable "public_subnet_cidrs" {
  type        = list(string)
}

variable "availability_zones" {
  type        = list(string)
}
main.tfファイルで使用するモジュールを設定しましょう
1
2
3
4
5
6
module "static-server" {
  source               = "./modules/static-server"
  vpc_cidr             = "10.0.0.0/16"
  public_subnet_cidrs  = ["10.0.1.0/24", "10.0.2.0/24"]
  availability_zones   = ["us-east-1a", "us-east-1c"]
}
main.tfがあるディレクトリ階層で次のコマンドを使ってサーバーを構築しましょう。
1
2
3
4
export AWS_PROFILE=構築しようとするAWS環境のcredential profile設定名
terraform init
terraform plan
terraform apply
正常に構築が完了したら次のコマンドでEC2にSSMでアクセスしましょう。
まず構築されたEC2のインスタンスIDを確保しておきましょう。(AWS dashboard、CLIコマンドで確認可能)
(ここではSSMアクセスを基準に説明しますが、SSH、AWS dashboardどこでも自分が便利な方法でアクセスすればよいです。)
1
2
export AWS_PROFILE=構築しようとするAWS環境のcredential profile設定名
aws ssm start-session --target i-xxxxxx
アクセスができたら次のコマンドでnginxを構築しましょう。
1
2
3
4
5
6
sudo yum update -y
sudo yum install -y nginx
sudo mv /usr/share/nginx/html/index.html /usr/share/nginx/html/index.html.bak
echo "<h1>Welcome to My Custom Website!</h1>" | sudo tee /usr/share/nginx/html/index.html
sudo systemctl start nginx
sudo systemctl enable nginx
次のURLで該当ページが開くか確認しましょう。
http://(EC2に割り当てたIPアドレス)

ページが確認できたら、今度は特定のIPからのみ受信を許可するようにインバウンドルールを作成しましょう。
modules/static-server/main.tfのコードでセキュリティグループルールを修正しましょう。
1
2
3
4
5
6
7
8
9
10
11
12
13
14
15
16
17
18
19
resource "aws_security_group_rule" "static-server-sg-rule" {
  type                     = "ingress"
  from_port                = 0
  to_port                  = 0
  protocol                 = "-1"
  security_group_id        = aws_security_group.static-server-sg.id
- cidr_blocks = ["0.0.0.0/0"]
}
+ data "aws_eip" "existing-proxy-server-eip" {
+   id = "プロキシサーバーIPで使用するelastic IPのid(eipalloc-xxxx)"
+ }
resource "aws_security_group_rule" "static-server-sg-rule" {
  type                     = "ingress"
  from_port                = 0
  to_port                  = 0
  protocol                 = "-1"
  security_group_id        = aws_security_group.static-server-sg.id
+ cidr_blocks              = ["${data.aws_eip.existing-proxy-server-eip.public_ip}/32"]
}
修正が終わったら再度terraformコマンドを使って変更事項をAWSに反映させましょう。
1
2
terraform plan
terraform apply
再度固定サーバーのnginx URLにアクセスして該当ページが開かないことを確認しましょう。(開かないことが正常)
http://(EC2に割り当てたIPアドレス)
次のリンクで続く(プロキシサーバー作成)