ローカルPCから固定IPでのみアクセス可能なサイトにアクセスする方法(2)(Feat. EC2, SSM port forwarding)
プロキシサーバーを作成する

先ほど固定IPからのみアクセス可能なサーバーを構築しました。
今度はローカルPCでDockerを構築し、ローカルPCでサーバーを構築し、VPCとの通信が可能になるようにポートフォワーディングを行いましょう。
復習として、今構築しようとしているアーキテクチャは以下の通りです。
アーキテクチャ
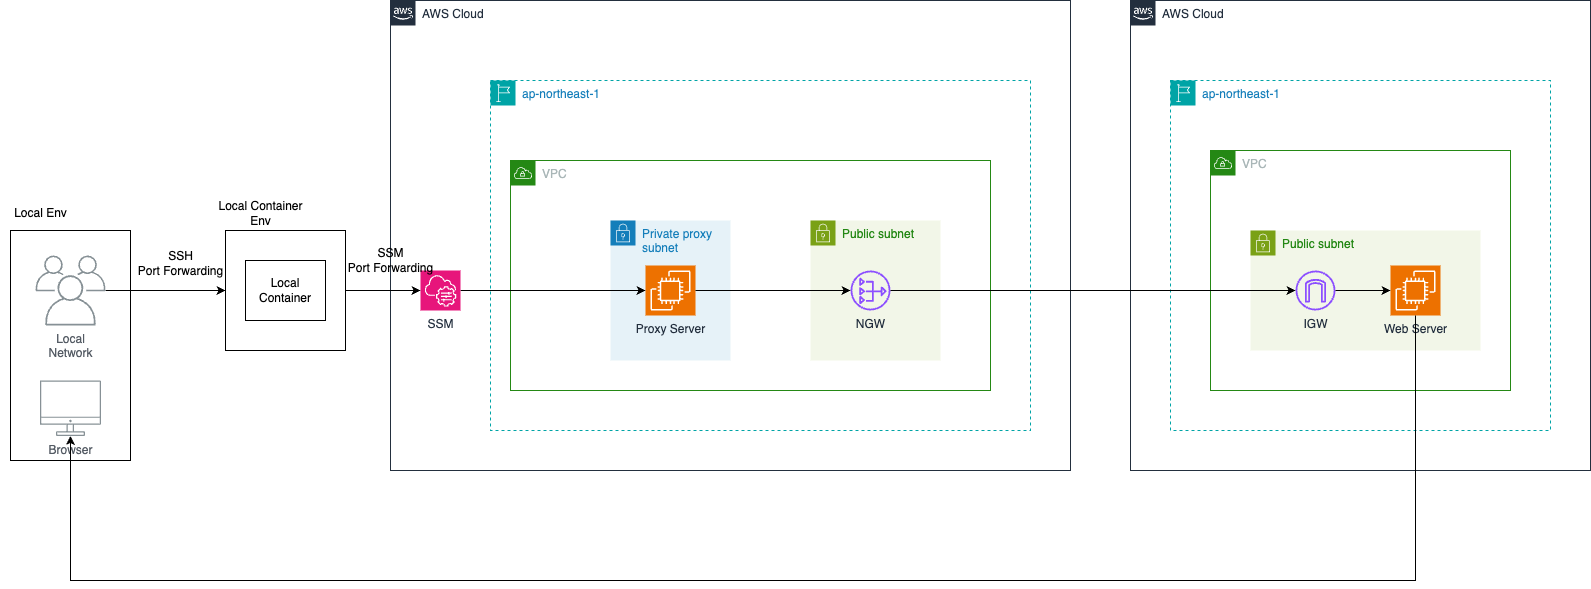
そして現在は次の段階を設定しようとしています。
- ローカルPCでDockerコンテナを構築(アプリケーション兼ポートフォワーディング用)
- VPC内にprivate subnetを構築
- NAT Gatewayを割り当て
- プロキシ用EC2、squidでプロキシ設定
- アクセステスト
まずプロキシサーバーを構築しましょう。
前のポストに書かれていますが、もう一度書くとフォルダ構成は以下の通りです。
フォルダ構成
1
2
3
4
5
6
7
8
9
10
11
12
13
14
15
16
17
18
19
20
21
22
│── proxy-server-test/
  │── infra/
     │── modules/
       │── static-server -> 固定IP対象サーバー
           │── main.tf -> 各種AWSサービス定義
           │── variables.tf -> main.tfで使用する変数定義
           │── output.tf -> 他のmoduleでも使用できるように変数export
       │── proxy-server -> プロキシサーバー
           │── main.tf -> 各種AWSサービス定義
           │── variables.tf -> main.tfで使用する変数定義
           │── output.tf -> 他のmoduleでも使用できるように変数export
     │── main.tf -> 実行ファイル
     │── provider.tf -> providerファイル
  │── docker-server/ -> ポートフォワーディングを行うdockerサーバー
     │── dockerFile
     │── docker-compose.yml
     │── container-startup-using-PF.sh
     │── ssh-for-proxy
        │── execution-local-to-container-port-forwarding.sh -> local -> dockerでポートフォワーディング(ssh)
        │── for-ssh -> 秘密鍵
        │── for-ssh.pub -> 公開鍵
        │── sshd_config -> sshサーバー
proxyサーバー構築
proxy-server/main.tfファイルで使用するモジュールを設定しましょう
1
2
3
4
5
6
7
8
9
10
11
12
13
14
15
16
17
18
19
20
21
22
23
24
25
26
27
28
29
30
31
32
33
34
35
36
37
38
39
40
41
42
43
44
45
46
47
48
49
50
51
52
53
54
55
56
57
58
59
60
61
62
63
64
65
66
67
68
69
70
71
72
73
74
75
76
77
78
79
80
81
82
83
84
85
86
87
88
89
90
91
92
93
94
95
96
97
98
99
100
101
102
103
104
105
106
107
108
109
110
111
112
113
114
115
116
117
118
119
120
121
122
123
124
125
126
127
128
129
130
131
132
133
134
135
136
137
138
139
140
141
142
143
144
145
146
147
148
149
resource "aws_vpc" "proxy_server_vpc" {
  cidr_block           = var.vpc_cidr
  enable_dns_support   = true
  enable_dns_hostnames = true
  tags = {
    Name = "proxy-server-vpc"
  }
}

resource "aws_subnet" "public_subnet" {
  count                   = length(var.public_subnet_cidrs)
  vpc_id                  = aws_vpc.proxy_server_vpc.id
  cidr_block              = var.public_subnet_cidrs[count.index]
  availability_zone       = var.availability_zones[count.index]
  map_public_ip_on_launch = true
  tags = {
    Name = "proxy-server-subnet-public ${count.index + 1}"
  }
}

resource "aws_subnet" "private_proxy_server_subnet" {
  count                   = length(var.private_proxy_server_subnet_cidrs)
  vpc_id                  = aws_vpc.proxy_server_vpc.id
  cidr_block              = var.private_proxy_server_subnet_cidrs[count.index]
  availability_zone       = var.availability_zones[count.index]
  tags = {
    Name = "proxy-server-subnet-private ${count.index + 1}"
  }
}

resource "aws_internet_gateway" "igw" {
  vpc_id = aws_vpc.proxy_server_vpc.id
  tags = {
    Name = "proxy-server-igw"
  }
}

resource "aws_route_table" "public" {
  vpc_id = aws_vpc.proxy_server_vpc.id
  tags = {
    Name = "proxy-server-route-table-public"
  }
}

resource "aws_route" "public_default_route" {
  route_table_id         = aws_route_table.public.id
  destination_cidr_block = "0.0.0.0/0"
  gateway_id             = aws_internet_gateway.igw.id
}

resource "aws_route_table_association" "public" {
  count          = length(aws_subnet.public_subnet)
  subnet_id      = aws_subnet.public_subnet[count.index].id
  route_table_id = aws_route_table.public.id
}

data "aws_eip" "existing_proxy_eip" {
  id = "プロキシサーバーIPで使用するelastic IPのid(eipalloc-xxxx)"
}

resource "aws_nat_gateway" "nat" {
  allocation_id = data.aws_eip.existing_proxy_eip.id
  subnet_id     = aws_subnet.public_subnet[0].id
  tags = {
    Name = "proxy-server-nat-gateway"
  }
}

resource "aws_route_table" "private" {
  vpc_id = aws_vpc.proxy_server_vpc.id
  tags = {
    Name = "proxy-server-route-table-private"
  }
}

resource "aws_route" "private_nat_route" {
  route_table_id       = aws_route_table.private.id
  destination_cidr_block = "0.0.0.0/0"
  nat_gateway_id       = aws_nat_gateway.nat.id
}

locals {
  all_private_subnets = flatten([
    aws_subnet.private_proxy_server_subnet[*].id,
  ])
}

resource "aws_route_table_association" "private" {
  for_each      = { for idx, id in local.all_private_subnets : idx => id }
  subnet_id     = each.value
  route_table_id = aws_route_table.private.id
}

resource "aws_security_group" "proxy_server_sg" {
  name        = "proxy_server_sg"
  description = "proxy server sg"
  vpc_id      = aws_vpc.proxy_server_vpc.id

  egress {
    from_port   = 0
    to_port     = 0
    protocol    = "-1"
    cidr_blocks = ["0.0.0.0/0"]
  }

  tags = {
    Name = "proxy_server_sg"
  }
}

resource "aws_iam_role" "ssm_role" {
  name = "proxy-ssm-role"

  assume_role_policy = jsonencode({
    Version = "2012-10-17"
    Statement = [{
      Action = "sts:AssumeRole"
      Effect = "Allow"
      Principal = {
        Service = "ec2.amazonaws.com"
      }
    }]
  })
}

resource "aws_iam_policy_attachment" "ssm_attach" {
  name       = "proxy-ssm-policy-attach"
  roles      = [aws_iam_role.ssm_role.name]
  policy_arn = "arn:aws:iam::aws:policy/AmazonSSMManagedInstanceCore"
}

resource "aws_iam_instance_profile" "ssm_instance_profile" {
  name = "proxy-ssm-instance-profile"
  role = aws_iam_role.ssm_role.name
}

resource "aws_instance" "proxy_server_instance" {
  ami                  = "ami-0c518311db5640eff"
  instance_type        = "t4g.micro"
  subnet_id            = aws_subnet.private_proxy_server_subnet[0].id
  vpc_security_group_ids      = [aws_security_group.proxy_server_sg.id]
  iam_instance_profile = aws_iam_instance_profile.ssm_instance_profile.name

  associate_public_ip_address = false

  tags = {
    Name = "proxy-server-instance"
  }
}
variable.tfファイルで割り当てるパラメータを設定しましょう。
1
2
3
4
5
6
7
8
9
10
11
12
13
14
15
variable "vpc_cidr" {
  type = string
}

variable "public_subnet_cidrs" {
  type = list(string)
}

variable "private_proxy_server_subnet_cidrs" {
  type = list(string)
}

variable "availability_zones" {
  type = list(string)
}
main.tfファイルで使用するモジュールを設定しましょう
1
2
3
4
5
6
7
module "proxy-server" {
  source               = "./modules/proxy-server"
  vpc_cidr             = "172.16.0.0/16"
  public_subnet_cidrs  = ["172.16.1.0/24", "172.16.2.0/24"]
  private_proxy_server_subnet_cidrs = ["172.16.3.0/24", "172.16.4.0/24"]
  availability_zones   = ["us-east-1a", "us-east-1c"]
}
main.tfがあるディレクトリ階層で次のコマンドを使ってサーバーを構築しましょう。
1
2
3
4
export AWS_PROFILE=構築しようとするAWS環境のcredential profile設定名
terraform init
terraform plan
terraform apply
正常に構築が完了したら次のコマンドでEC2にSSMでアクセスしましょう。
まず構築されたproxy serverのEC2インスタンスIDを確保しておきましょう。(AWS dashboard、CLIコマンドで確認可能)
(ここではSSMアクセスを基準に説明しますが、SSH、AWS dashboardどこでも自分が便利な方法でアクセスすればよいです。)
1
2
export AWS_PROFILE=構築しようとするAWS環境のcredential profile設定名
aws ssm start-session --target i-xxxxxx
アクセスができたら次のコマンドでproxyサーバーの役割をするsquidを構築しましょう。
1
sudo yum update -y && sudo yum install -y squid && sudo yum clean all
次のコマンドでsquid.confを開いてみましょう
1
sudo vi /etc/squid/squid.conf
開いてみると様々な設定があると思いますが
ここで次の設定通りにまず設定してみましょう
(テスト用にすべてのリクエストを許可にしておいて開始します。特定のIPのみ許可したい場合は好みに合わせて別途ACLを設定してもよいです)
1
2
3
4
5
6
7
8
9
10
11
12
13
14
15
16
17
18
19
20
21
22
23
24
25
26
27
28
29
30
31
32
33
34
35
36
37
38
39
40
41
42
43
44
45
46
47
48
49
50
51
52
53
54
55
56
57
58
59
60
61
62
63
64
65
66
67
68
69
70
71
72
73
74
75
76
77
78
79
80
81
82
83
84
85
86
87
88
89
90
91
92
#
# Recommended minimum configuration:
#

# Example rule allowing access from your local networks.
# Adapt to list your (internal) IP networks from where browsing
# should be allowed
acl localnet src 0.0.0.1-0.255.255.255  # RFC 1122 "this" network (LAN)
acl localnet src 10.0.0.0/8             # RFC 1918 local private network (LAN)
acl localnet src 100.64.0.0/10          # RFC 6598 shared address space (CGN)
acl localnet src 169.254.0.0/16         # RFC 3927 link-local (directly plugged) machines
acl localnet src 172.16.0.0/12          # RFC 1918 local private network (LAN)
acl localnet src 192.168.0.0/16         # RFC 1918 local private network (LAN)
acl localnet src fc00::/7               # RFC 4193 local private network range
acl localnet src fe80::/10              # RFC 4291 link-local (directly plugged) machines

acl SSL_ports port 443
acl Safe_ports port 80          # http
acl Safe_ports port 21          # ftp
acl Safe_ports port 443         # https
acl Safe_ports port 70          # gopher
acl Safe_ports port 210         # wais
acl Safe_ports port 1025-65535  # unregistered ports
acl Safe_ports port 280         # http-mgmt
acl Safe_ports port 488         # gss-http
acl Safe_ports port 591         # filemaker
acl Safe_ports port 777         # multiling http

#
# Recommended minimum Access Permission configuration:
#
# Deny requests to certain unsafe ports
#http_access deny !Safe_ports

# Deny CONNECT to other than secure SSL ports
#http_access deny CONNECT !SSL_ports

# Only allow cachemgr access from localhost
#http_access allow localhost manager
#http_access deny manager

# This default configuration only allows localhost requests because a more
# permissive Squid installation could introduce new attack vectors into the
# network by proxying external TCP connections to unprotected services.
#http_access allow localhost

# The two deny rules below are unnecessary in this default configuration
# because they are followed by a "deny all" rule. However, they may become
# critically important when you start allowing external requests below them.

# Protect web applications running on the same server as Squid. They often
# assume that only local users can access them at "localhost" ports.
#http_access deny to_localhost

# Protect cloud servers that provide local users with sensitive info about
# their server via certain well-known link-local (a.k.a. APIPA) addresses.
#http_access deny to_linklocal

#
# INSERT YOUR OWN RULE(S) HERE TO ALLOW ACCESS FROM YOUR CLIENTS
#

# For example, to allow access from your local networks, you may uncomment the
# following rule (and/or add rules that match your definition of "local"):
# http_access allow localnet

# And finally deny all other access to this proxy
#http_access deny all

# Squid normally listens to port 3128
#http_port 3128

# Uncomment and adjust the following to add a disk cache directory.
#cache_dir ufs /var/spool/squid 100 16 256

# Leave coredumps in the first cache dir
coredump_dir /var/spool/squid

#
# Add any of your own refresh_pattern entries above these.
#
refresh_pattern ^ftp:           1440    20%     10080
refresh_pattern -i (/cgi-bin/|\?) 0     0%      0
refresh_pattern .               0       20%     4320

http_port 3128
acl all src all
http_access allow all
access_log /var/log/squid/access.log
cache_log /var/log/squid/cache.log
dns_v4_first on
cache_dir ufs /var/spool/squid 100 16 256
設定を保存したら次のコマンドでsquidを再起動しましょう
1
2
sudo systemctl restart squid
sudo systemctl status squid
次のリンクで続く(プロキシサーバー作成)